Managing Precipitation on Site
About SITES
This series unpacks elements of the Sustainable Sites Initiative (SITES™), which grew out of the same framework as USGBC’s LEED green building certification. This rating system evaluates the performance of a landscape site (anything from the building ‘skin’ outward) and accredits those that fulfill requirements and achieve a certain number of points.
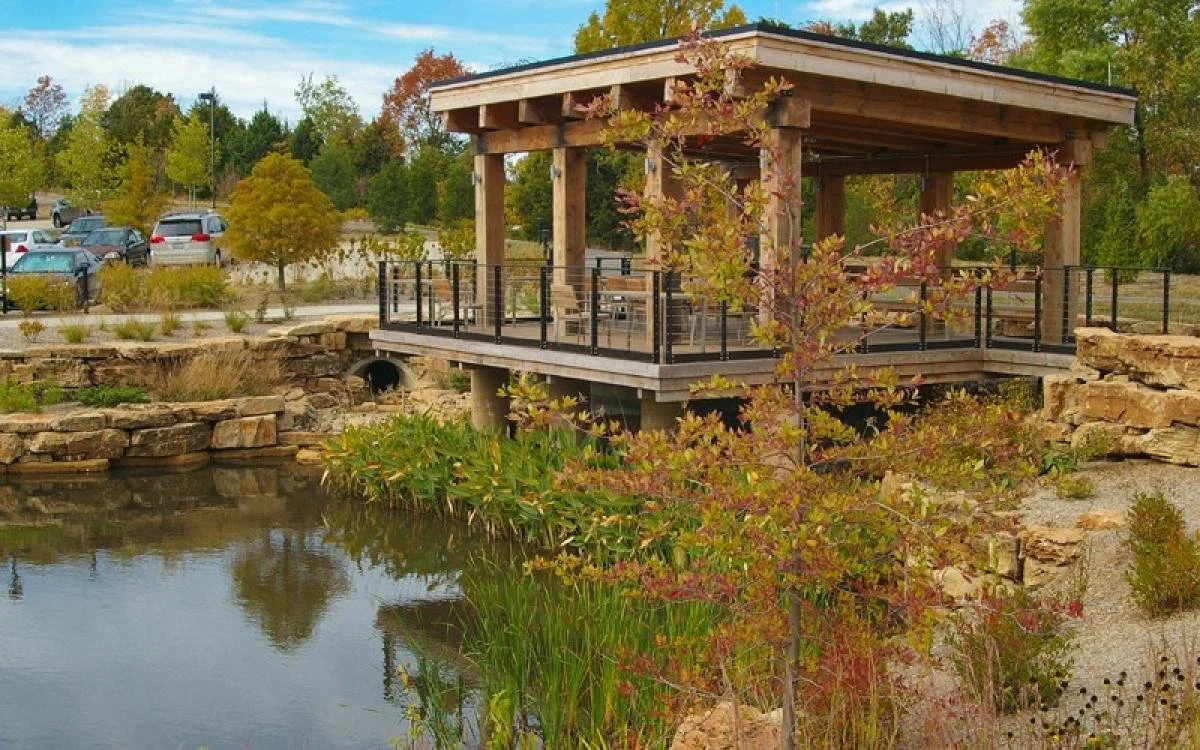
Pictured: Novus International Headquarters Campus
(SITES™ Accredited)
“By aligning land design and development practices with functions of healthy ecosystems, the SITES™ program demonstrates how the work of developers, property owners, landscape architects… can protect, restore, and enhance ecosystem services.” (SITES™ v2 Reference Guide)
“Ecosystem services are goods and services of direct or indirect benefit to humans that are produced by ecosystem processes that involve the interactions of living elements, such as vegetation and soil organisms, and non-living elements such as bedrock, water, and air.” (SITES™)
The Water Cycle
There are many ecosystem services that can be protected, restored, and enhanced, which we’ll explore in this and future essays. Today, let’s focus on the water cycle and the ways in which sustainable design can lend a hand in conserving water and managing runoff, while protecting floodplains and aquatic ecosystems. The goal of this strategy is to mimic ecological systems, all while creating a landscape that’s as beautiful as it is functional.
For hundreds of years, industrial, agricultural, and urban development have degraded and disrupted natural systems, increased impervious surfaces, polluted watersheds, and emitted greenhouse gasses which have resulted in the climate crisis and its alarmingly destructive weather events we experience today.
A raindrop hits the ground of a parking lot, slicks off with accelerating speed towards a gutter, collecting pollutants and litter along the way. It enters a series of concrete tubes and eventually to the ocean: never to pass through a plant’s roots or an animal’s lips all while toxifying everything downstream.
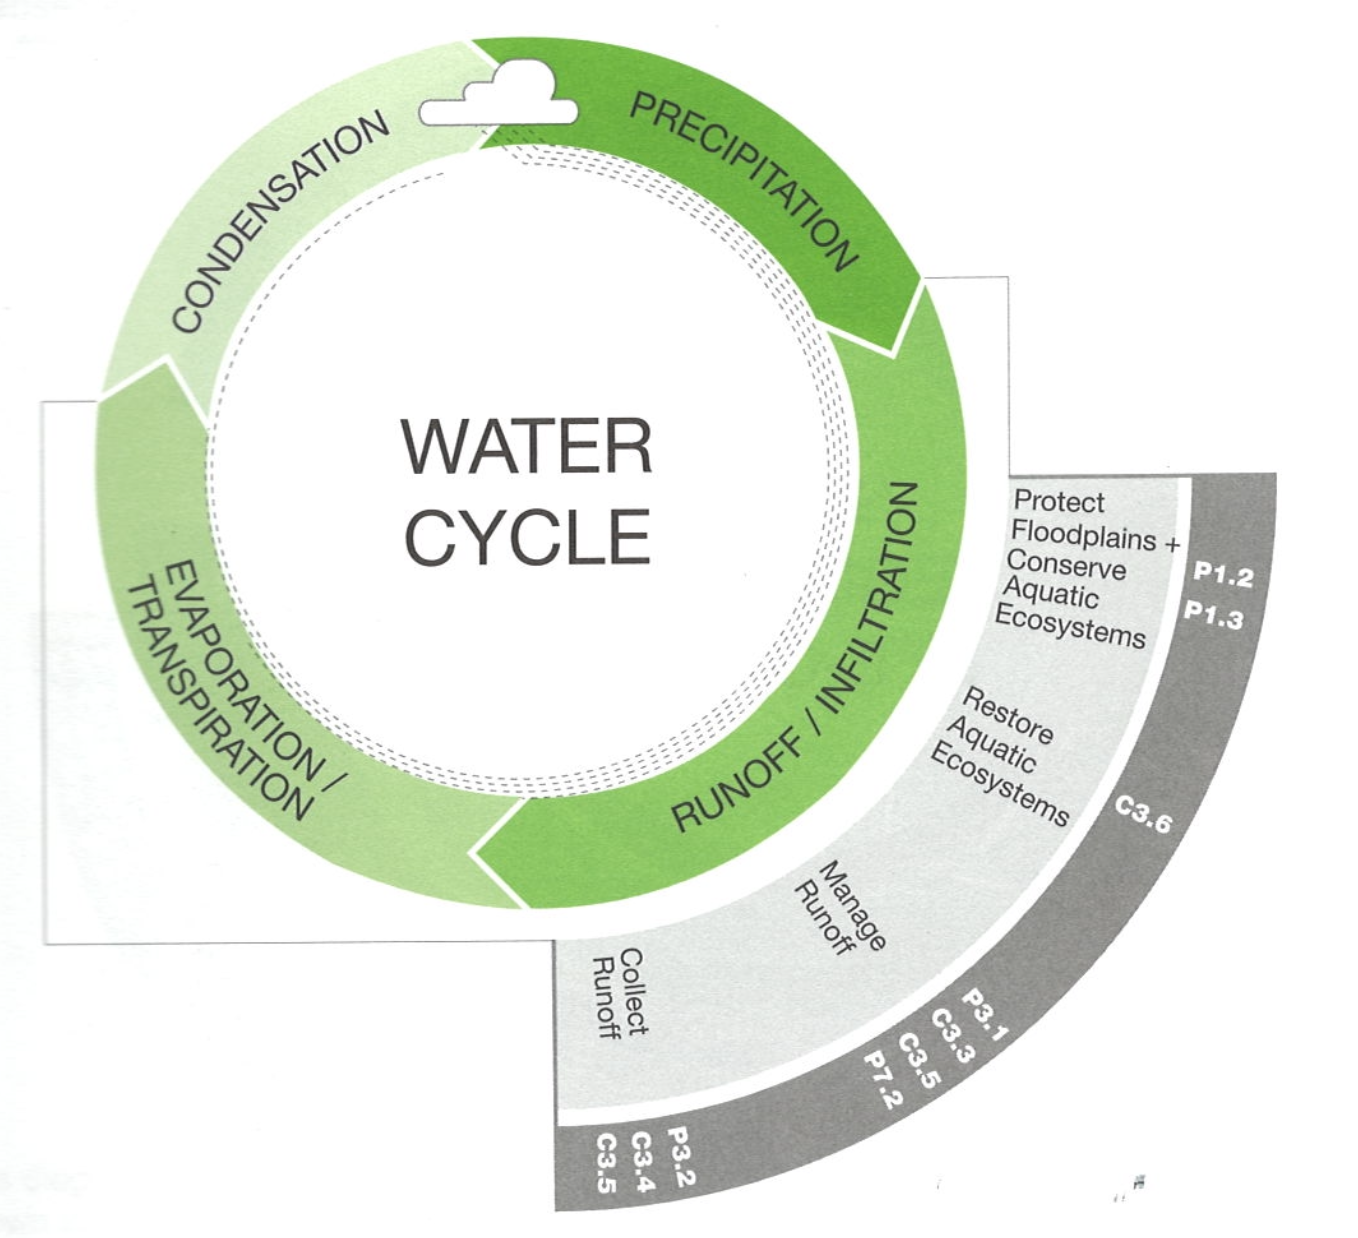
Our responsibility as land stewards is to slow water down again, and allow it to cycle through natural systems as it has for billions of years. You don’t need to pursue SITES™ accreditation in order to mitigate these issues in your next landscape design project (although let us know if you’re interested!).
The following unpacks Sustainable Sites Initiative prerequisite P3.1 Manage precipitation on site, under Section 3: Site Design—Water. Every SITES™ accredited landscape must retain a certain amount of water directly through the natural and built systems within the site’s boundaries. Let’s break down the criteria, calculations, and steps of “replicating natural hydrological conditions.”
Manage Precipitation on Site
In order to achieve SITES™ accreditation, a landscape intervention must (among a few other prerequisites) perform the following: retain the precipitation volume of the 60th percentile precipitation event through on-site infiltration, evapotranspiration, and reuse, while providing a maintenance plan that ensures long-term effectiveness of stormwater features.
Let’s start by unpacking this technical language a bit.
“Precipitation volume of the 60th percentile precipitation event…”
Translation: of all the rain events over the last few decades, this site needs to accommodate for the amount of water equivalent to the most intense rainstorm of the lowest 60% of events.
“...through on-site infiltration, evapotranspiration, and reuse…”
In other words, the way you accommodate this amount of water is through different landscape technologies, such as bioswales, rain gardens, cisterns, and even water art! These facilitate the water to cycle through its natural systems, like into the ground or up through plants.
“...while providing a maintenance plan that ensures long-term effectiveness of stormwater features.”
This part is a bit more self-explanatory, but nonetheless important. SITES has an entire section dedicated to sustainable operations and maintenance. Each site needs a documented plan to keep the system going strong.
If you want to go above and beyond, you can pursue the credit C3.3 Manage precipitation beyond baseline. If you can prove that the landscape design can support the volume of the 80th, 90th, or 95th precipitation event, you receive four, five, or six points, respectively.


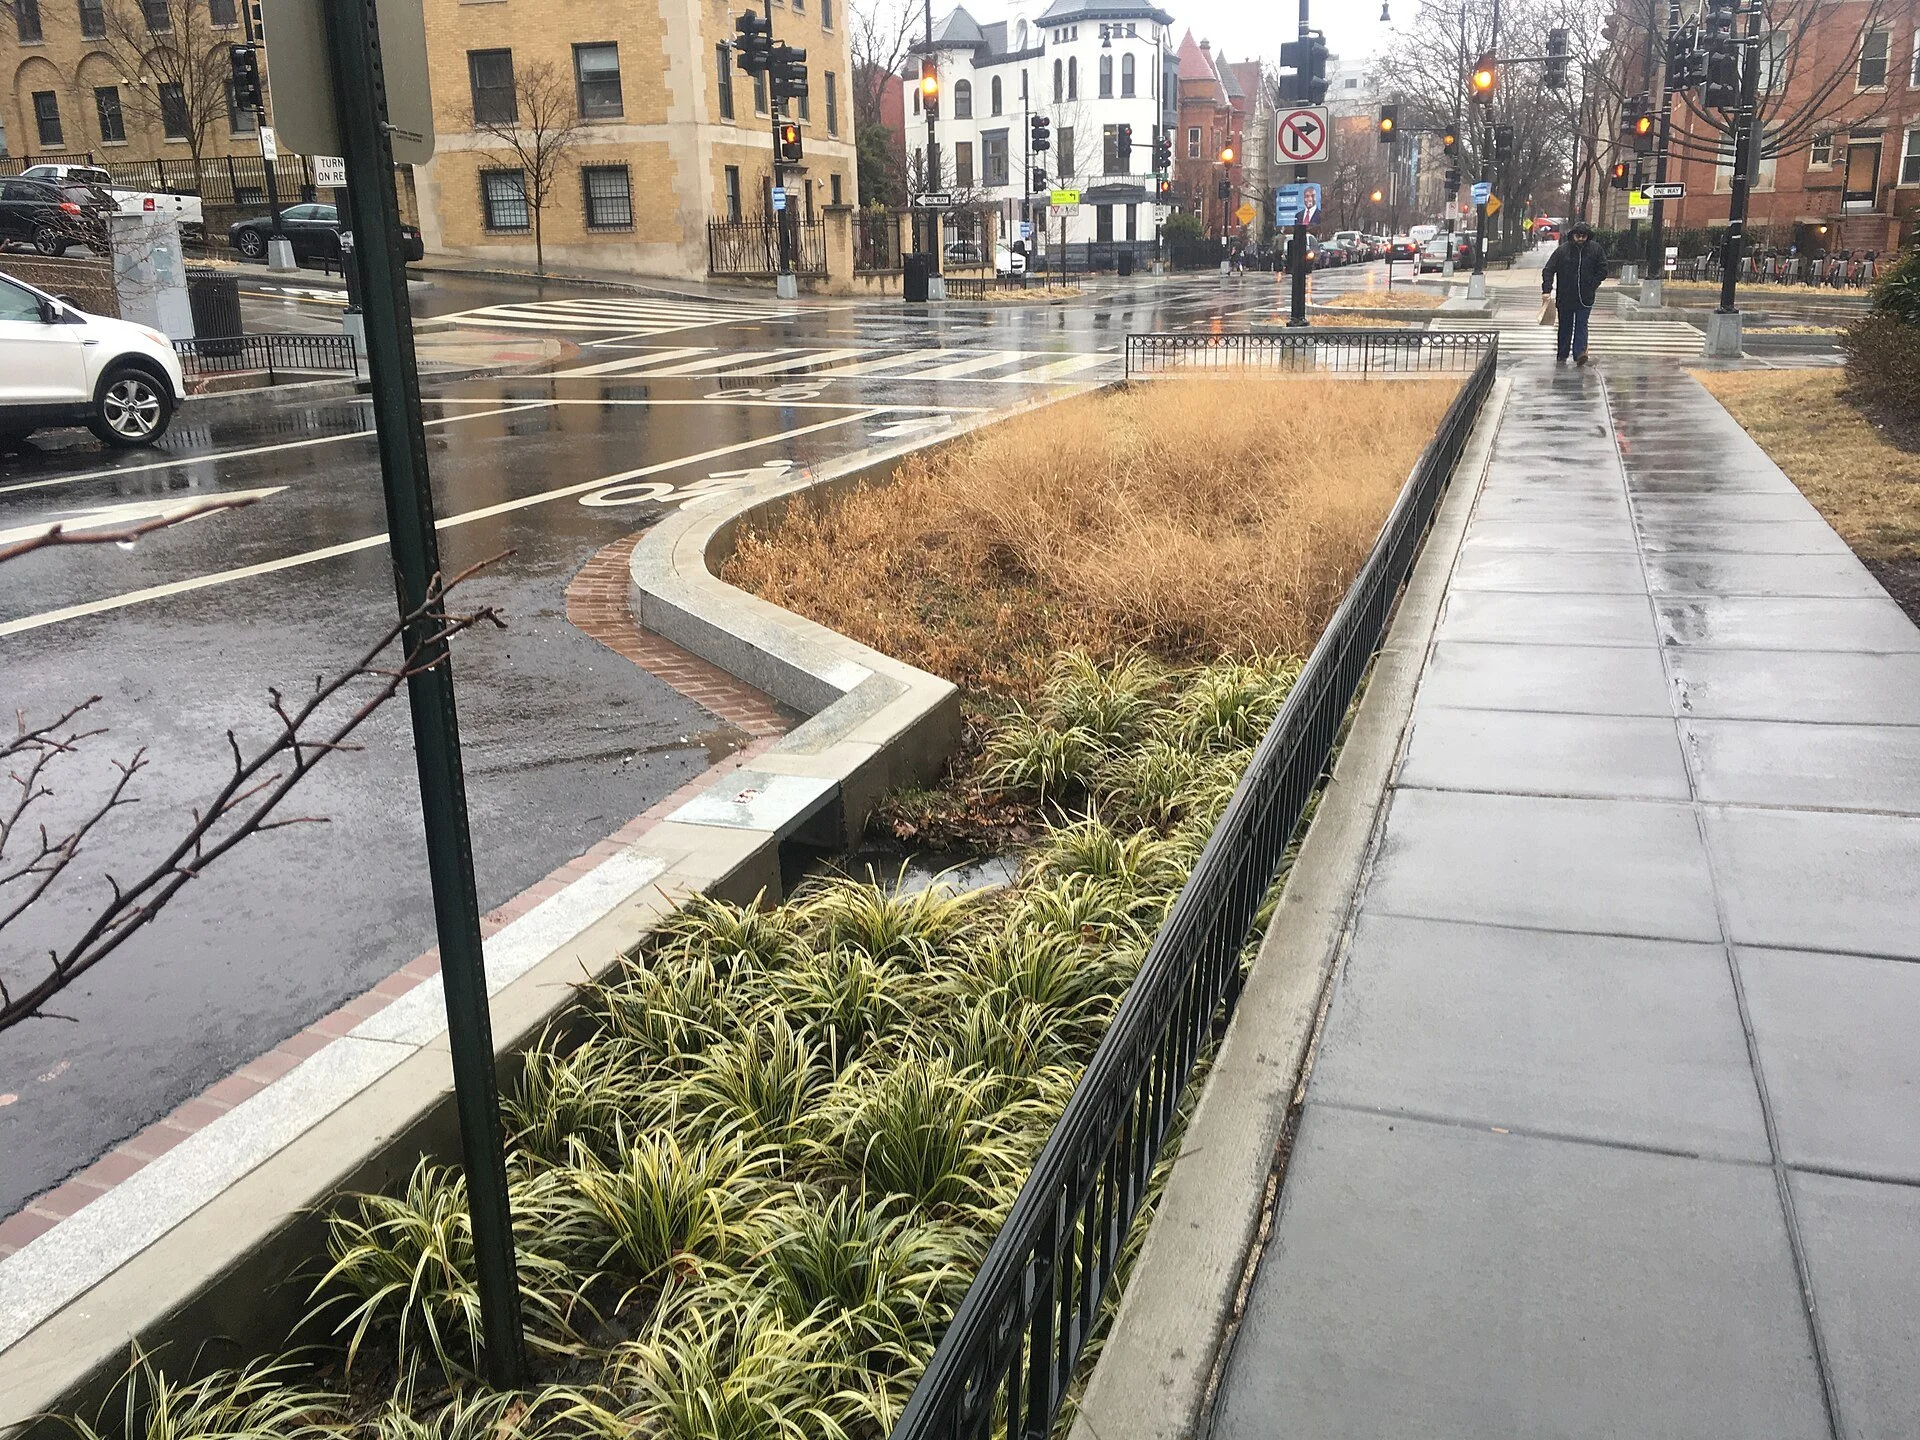
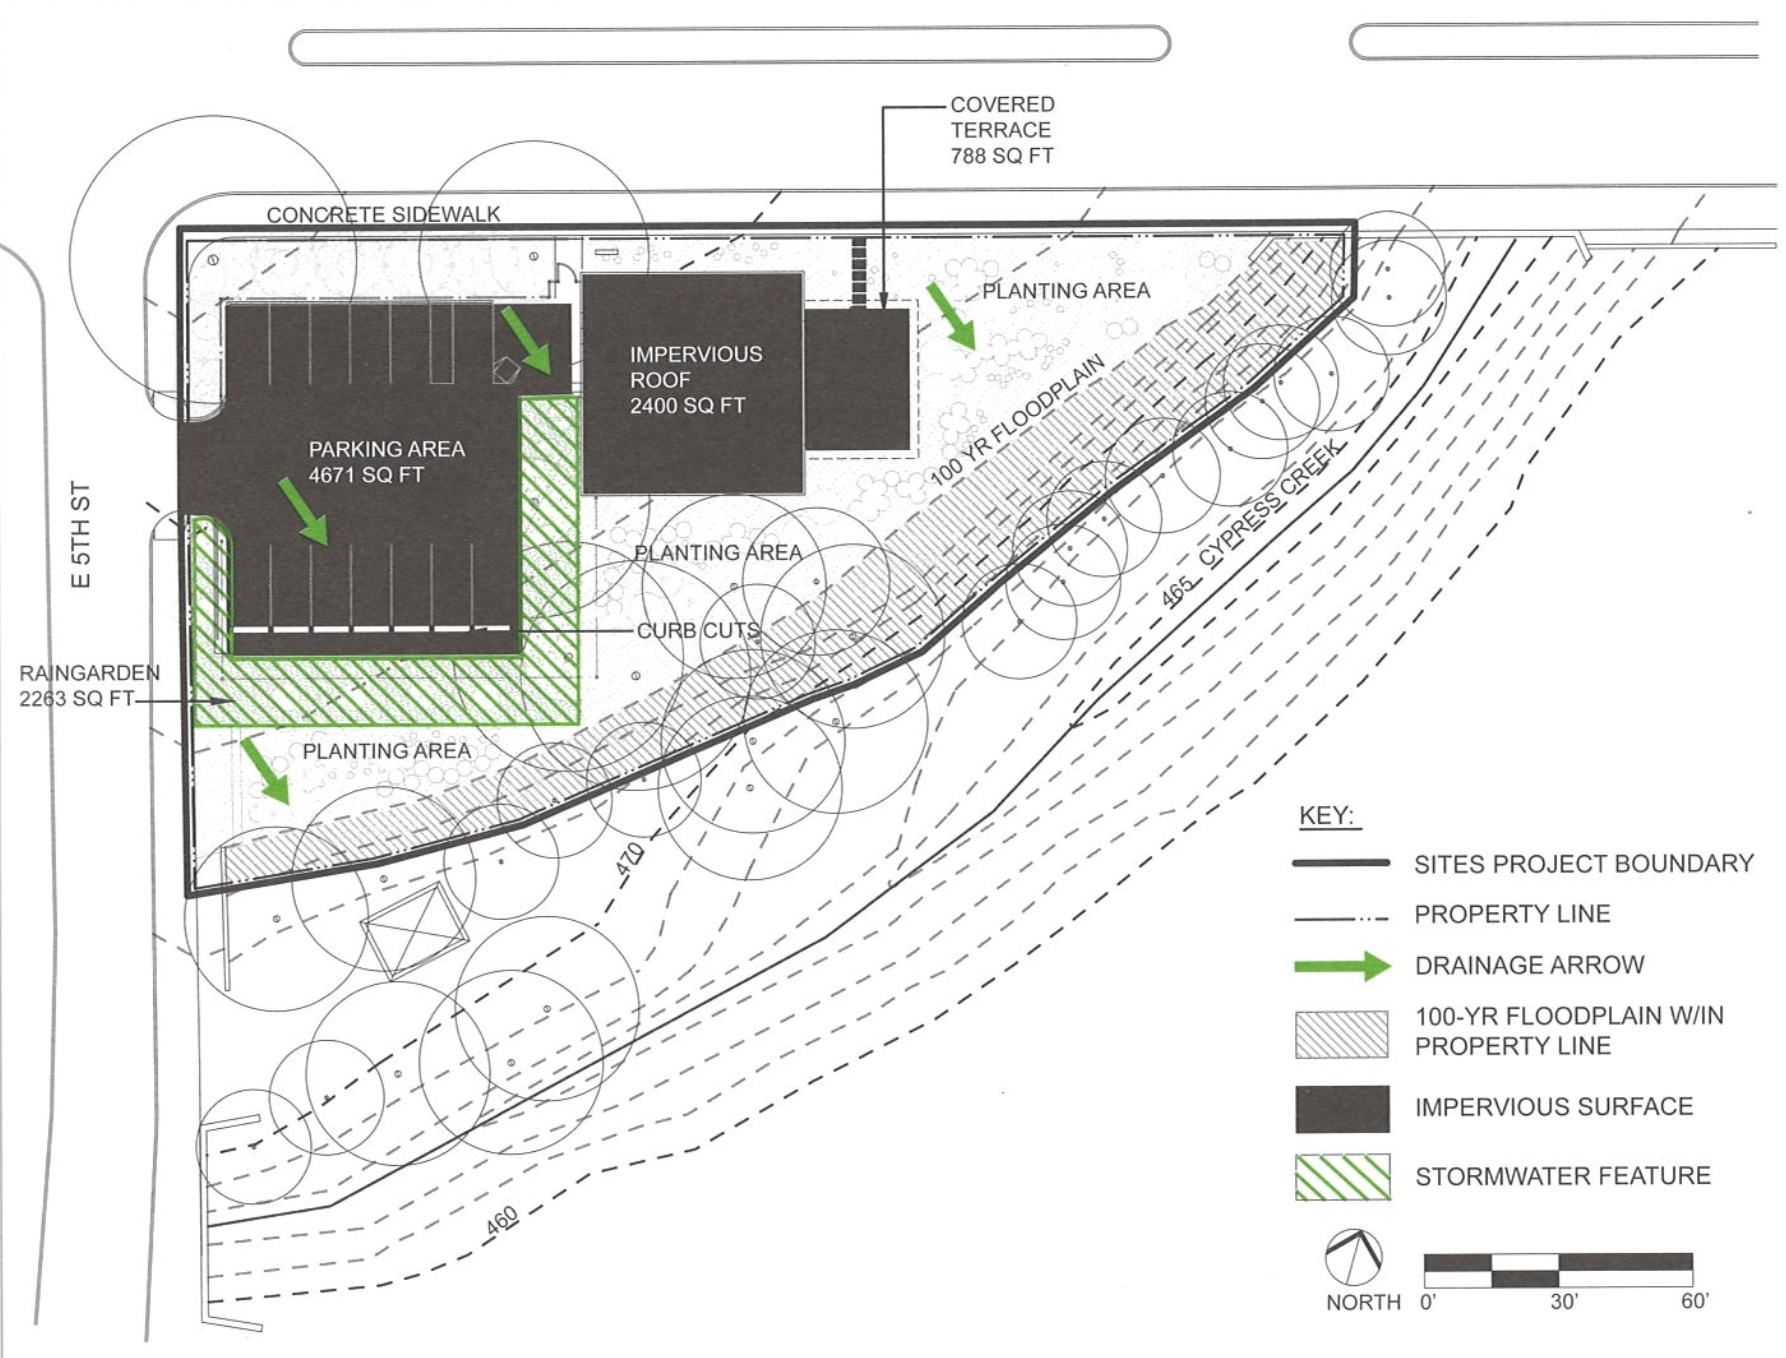
Stormwater Features
Rain Gardens & Bioswales are simple but powerful examples of this technology that retain and infiltrate water. These stormwater runoff systems are depressions in the earth that either hold or convey rainwater as it either slowly seeps into the ground or evapotranspires through plants.
Each is dug into the earth and is often filled with a gravel base. Bioretention soils that are high in sand and silt, low in clay, are added along the bottom and sides of the depression. Native plants that tolerate lots of water in between dry seasons are planted, which both filter pollutants and provide habitat for pollinators and birds.
The primary difference between the two is that a rain garden typically is the ‘final resting place’ for rainwater as it goes into the air or ground, while a bioswale transports water away from buildings and towards standing water, a dry well, detention/retention pond, or a rain garden. In places without well-drained soil, It’s common to add perforated pipes to the bottom of bioswales to transport water in heavy rain events.
>> Stormwater Best Management Practices — BMPs (EPA)
>> Intro to Bioswales (Home & Garden Information Center)
Rain Barrels & Cisterns are rainwater harvesting systems that alleviate stormwater runoff. By hooking these up to your roof’s downspouts, you can hold onto water for later use on plants, lawn, or your car. A cistern is simply a large rain barrel or system, typically housing hundreds or thousands of gallons. The key to maintenance is to not let water sit too long, and use screens to prevent leaves and organic material from entering, which causes the development of, among other problematic things, mosquitoes.
>> Rainwater Harvesting Practices (EPA)
Water Art & Features. Beyond sustaining all life and having powerful, destructive properties, water is inherently a beautiful thing. Expressing water in the landscape is a strong way to connect us with the very systems that sustain us. Whether through traditional ponds, rivers, pools, waterfalls, and baths, or a more whimsical effect like rain chains and chimes, water harmonizes the biotic and abiotic, and should be expressed as such.
Now let’s get into the nitty gritty of how you can calculate your own rain volume to help design stormwater features effectively in your landscape.

Calculating Volume of Precipitation
1. Get local precipitation data
Visit NOAA’s database of climate records, and look up your county’s daily summaries with this search tool.
Find the closest station that has the longest range of dates (aim for a few decades).
Go through the process to request the data as a CSV file; it may take some time to receive the download link in your inbox after you submit the request.
2. Find the 60th percentile precipitation event
Open the CSV file in a spreadsheet tool.
Sort the rainfall events from highest to lowest, and add two columns.
Delete any rainfall events that are 0.1 inches or less, as they may skew the data.
Rank each event from 1 (highest) through the amount of events remaining in the set.
In the final column, add the equation (Total–Rank) / (Total).
Example: with 1,000 events, the first ranked event would be calculated as (1,000–1)/(1,000) = 99.97%
This calculates the percentage of rainfall events that are less than each ranked event.
Simply locate the 60th event (or 85th, 90th, 95th depending on the credit you’re pursuing)
This is the amount of rain in inches that must be accommodated on site.
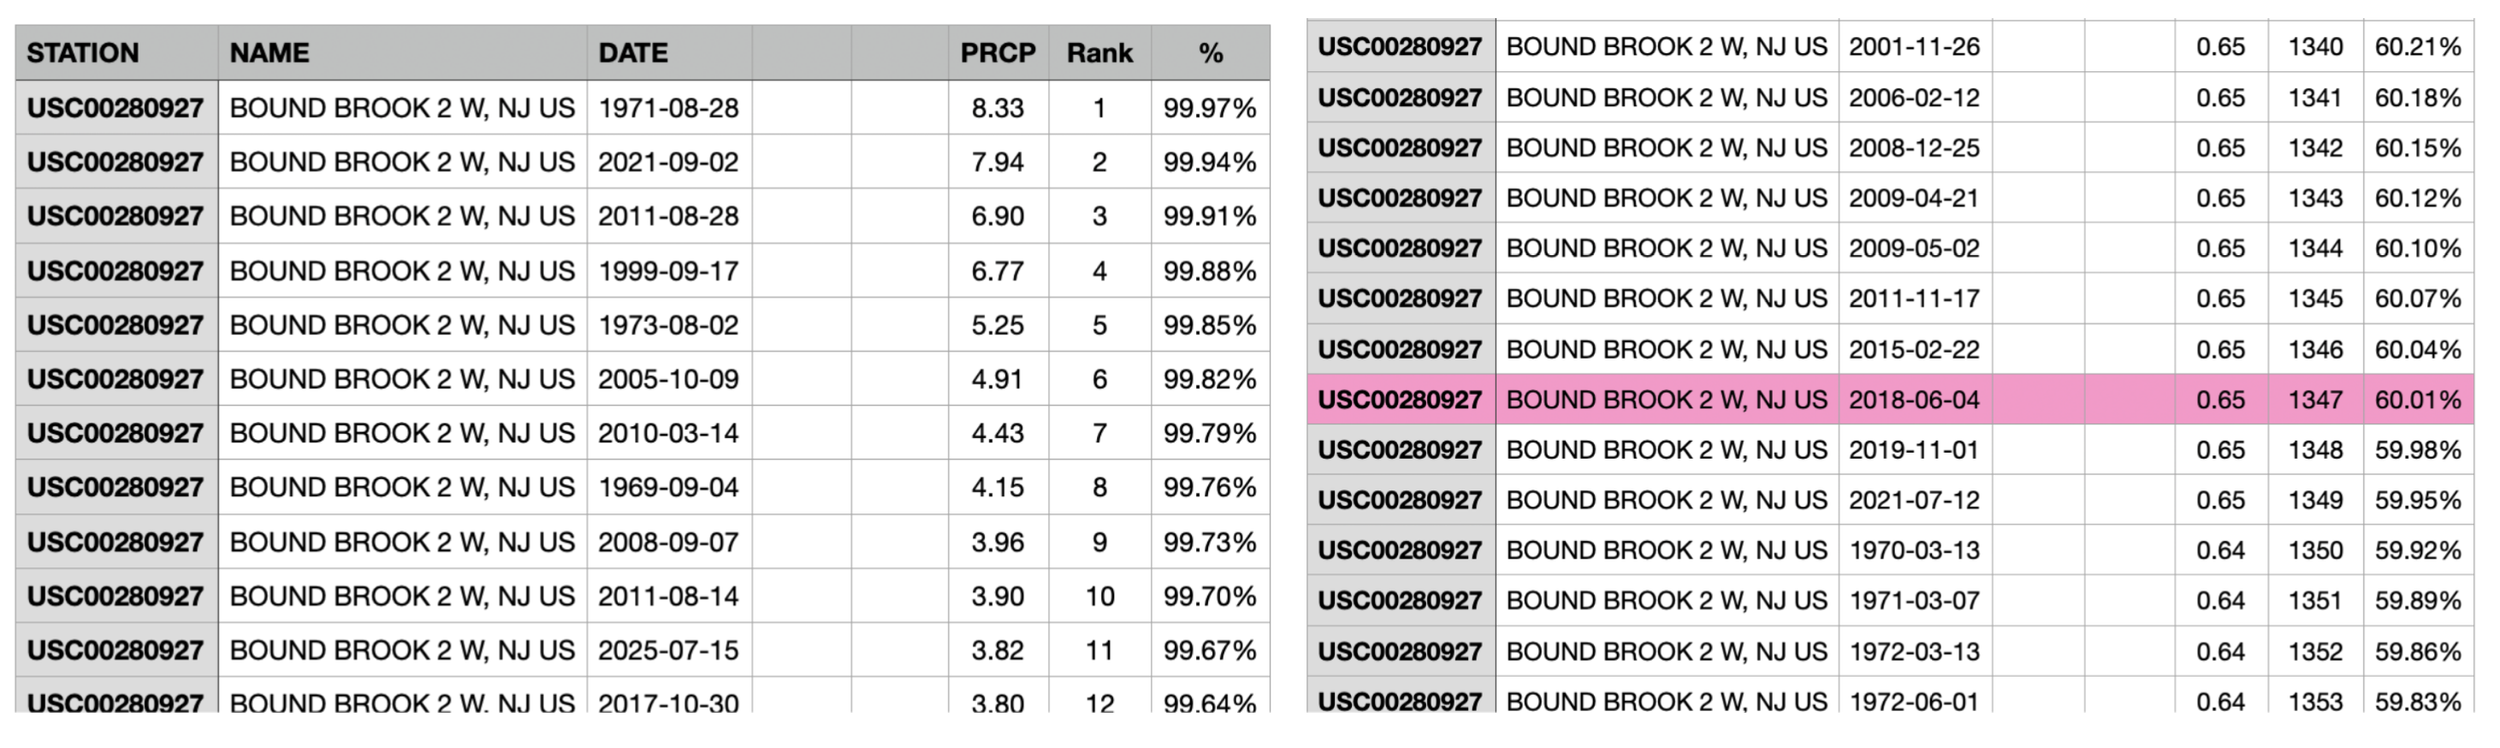
Example of daily precipitation events, ranked highest to lowest.
3. Calculate impervious surface coverage
In order to calculate volume, we must first have the surface area that we’re accounting for. SITES requires only the area of impervious surfaces to be included in this equation. Impervious surfaces include roofs, driveways, pathways, anywhere water cannot naturally seep into the ground.*
Measure the area taken up by roofed structures and buildings.
Measure the area of all hardscaped surfaces (asphalt, concrete, stone, pavers).
Add up the total square footage of these areas.
*A note about lawn: while SITES doesn’t recognize lawns as impervious surfaces, they typically do not infiltrate water very well and ultimately act much like an impervious surface. We recommend including lawn area in your calculations to accommodate for as much water on site as possible.
4. Coverage (sqft) x Rainfall (ft) = Volume (cu ft)
Convert inches of precipitation to feet by dividing by 12
Xth Percentile Rain Event x Area of Impervious Surface = Volume of Precipitation (cu ft)
Use this number when designing stormwater features, and compare infiltration rates, evapotranspiration rates, and rainwater harvesting sizes (each technology varies in how water capacity is calculated).
Getting started
All this technical stuff can get a bit overwhelming.
Begin your relationship with water by noticing it.
Watch how it flows from drains and surfaces. Make notes on a simple map.
The land and water have a lot to tell us if we listen.
If you’re stuck along the way, reach out and we’ll jump right in.

Opportunity is in every landscape.
From the ground up,
Design Ecosystems with us.
Check out other related essays from our Sustainable SITES Series